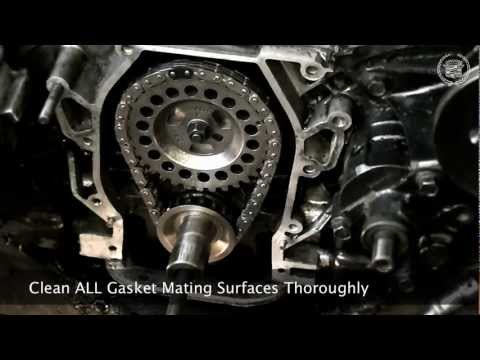
How I replaced: + Crankshaft Sprocket + Camshaft Sprocket + Timing Chain + Timing Cover Oil Seal + TIming Cover Gasket + Water Pump + Gasket (This video does…
How I replaced: + Crankshaft Sprocket + Camshaft Sprocket + Timing Chain + Timing Cover Oil Seal + TIming Cover Gasket + Water Pump + Gasket (This video does…
You must be logged in to post a comment.
)
well sounds like im going to take it back apart them..smh
i have it set up at key to dot. the notch on the balancer seemed to be way off if its dot to dot. i ended up using a rubber mallet instead. all i have left is to install the plug wires and all the pulleys. if it dont run im going to match up the dots on the gears.
The diagram from AllDataDIY says that when the dots are lined up, the number one cylinder is at TDC, and since there were dots in identical locations on both old and new sprockets, I feel confident about lining up the dots. The keyway itself, in this case, isnt the indicator of TDC. If in doubt, I think you could measure it manually through the spark plug hole to confirm. Since I had a nice agreement between the sprockets and the diagram, I ended up not confirming it manually.
*whether… sorry for the typo.
Sorry to hear the bolts didn’t work out. Did you learn anything that might help me when I employ my custom-threaded-rod installer?
If you’re interested in seeing how I plan to do it, I’d be happy to upload a drawing of the tool I’m making. The only uncertainty in my method is weather a 9/16″ threaded rod is thick enough to do the job (considering most installers seem to be like 3/4″-1″ thick).
well i double checked and im still confused. if you align the key with the dot on the cam gear and just mock up the cover along with the balancer. the notch on the balancer shows to be at tdc. but if you do the dots together the notch is at way before tdc….i think
i found a few bolts that kind of worked… but did not go to well so i just used a mallet on that hub
Alex, were you able to find a bolt and install your harmonic balancer? We’ve resorted to ordering a threaded rod on McMaster.com which I’m going to grind down one end to allow me to grab it with a wrench while I press the harmonic balancer on with a nut, bearing and washer to mimic the real harmonic balancer installer kit as much as possible. Let me know how things go for you, and I’ll be sure to let you know how my method works out too.
Alex, you were COMPLETELY right about the sprocket alignment. I fixed the alignment over the weekend. Thank you SO much for saving me hours and hours of unnecessary confusion and work! I uploaded the correct alignment diagram to my project website if you’re interested (1984coupedeville dot wordpressCOM).
Thanks again!!
Just sent you an email a little bit ago. I also miraculously found three other videos I took that day. Not sure they will help you, but I uploaded them anyway and sent you the links in a second email.
Will do. 🙂
a.delao87@gmail.com send me the pic when you get a chance
Me too! I can’t wait until mine is running.
When I took the distributor off, I marked the location of the rotor with a permanent marker on the base. I’ll upload a drawing of how mine was aligned for you when I get home in a couple hours.
no problem. i want to drive this fleetwood already. do you happen to have the distrubitor rotor aligned as well not to sure if i did mine right
Sounds good. I hope you find a bolt that works. For my own curiosity, let me know if it’s anything other than a 9/16″-12.
Ah, no problem. I’m 99% sure there wasn’t a dot on mine, but when I get home from work today, I’ll clean up my old one and make sure I didn’t miss anything, just to be 110% sure.
Thanks for all your comments. 🙂
im going to look for a bolt at work. we have a wall full of hardware. might steal a few to find one that works with some big washers
We’re in the same situation. You’re going to have a hard time finding a harmonic balancer installer kit with the right adapter. I can’t find one at all. I can’t get a long enough bolt that fits the crankshaft to install it either. The bolt that fits is 9/16″-12 (course thread). Not even specialists carry it. Do you know how you’re going to put your harmonic balancer back on? I’d rather not use a mallet…. Some people heat it in the oven to make it expand. I’m considering that method.
i already have the timing cover on and the accessories on…but i bought the chain kit from autozone. the dot on the crack gear is very light compared to cam gear. its about 3 or 4 teeth away from the key
no bolt…
Can you take a picture of your original cam sprocket in it’s original position and email it to me? I want to see if yours looks the same. If yours has two dots, then you should definitely align the two dots.
I had to take a break from the project after I put the timing cover back on because of another component I had to hand-fabricate, so I’m just getting back to putting the rest of the components back on. I’ll let you know how it goes.
Btw, did your Fleetwood come with a crankshaft bolt? Mine had a cork….
I’ve been doing all these repairs under the guidance of a mentor that has 10+ years of repair experience. He was one of three people I had confirm the alignment of the sprockets.
how did your engine run afterwards. so far this vid is the only reference i have to work with. i bought the car with timing components already torn apart. im hoping to have it running by the end of the week
PS: If you have any other questions or wanted to see any other video, let me know. I’ll do my best to help out.
There was no dot on the crankshaft gear, so I spent a couple hours reading up on timing chain replacement to figure out how to properly align it. I also asked around, and after all my research, I realized that I was supposed to align the key mark with the dot on the cam sprocket. This was my first timing chain replacement, so I’m definitely not an expert — definitely do some research and ask around.
I hope your timing chain replacement goes smoothly. Let me know how it goes.
im also doing a chain on my 84 fleetwood. 4.1. wouldnt the key mark on pulley be out of time if it is aligned with the dot on cam?
What? Are you asking a question?
My Cadillac is an 4.1L V8.
Am talking about cadellic with six cylinder right bent camshaft oil seal driving by the weter pump
The original Milkshake motor
The only thing I took out to make my job easier was the radiator. 🙂 I find out that the more parts I take off in the repair process, everything becomes 10 times more complicated, so I’m trying to leave as much intact as possible. Glad you enjoyed the video. 😀
Smart idea of taking the front clip off the car (which i’m assuming you did because you are standing right up next to the engine…feel free to correct me if i’m wrong), that made the job easier & i’m almost positive a lot faster. very informative & great vids as usual 🙂
Thanks. 🙂
Nice
Keep in mind a stellar technician is tough to find and worth a fortune to dealers and customers alike. Keep up the good work. It will surely be worth it.
Thanks! My first try. I’m enjoying the learning experience. Lots to improve on by the next time I do a water pump replacement in the future! Glad you enjoyed the video. 🙂
nice work